发布方案总览
由于我太喜欢obsidian了,现在几乎所有的笔记和资料都在obsidian里。正好最近准备重启博客,所以我想把我的博客编写也放到ob里。目前体验这套流程几乎是零压力发布ob的方案,非常好用。
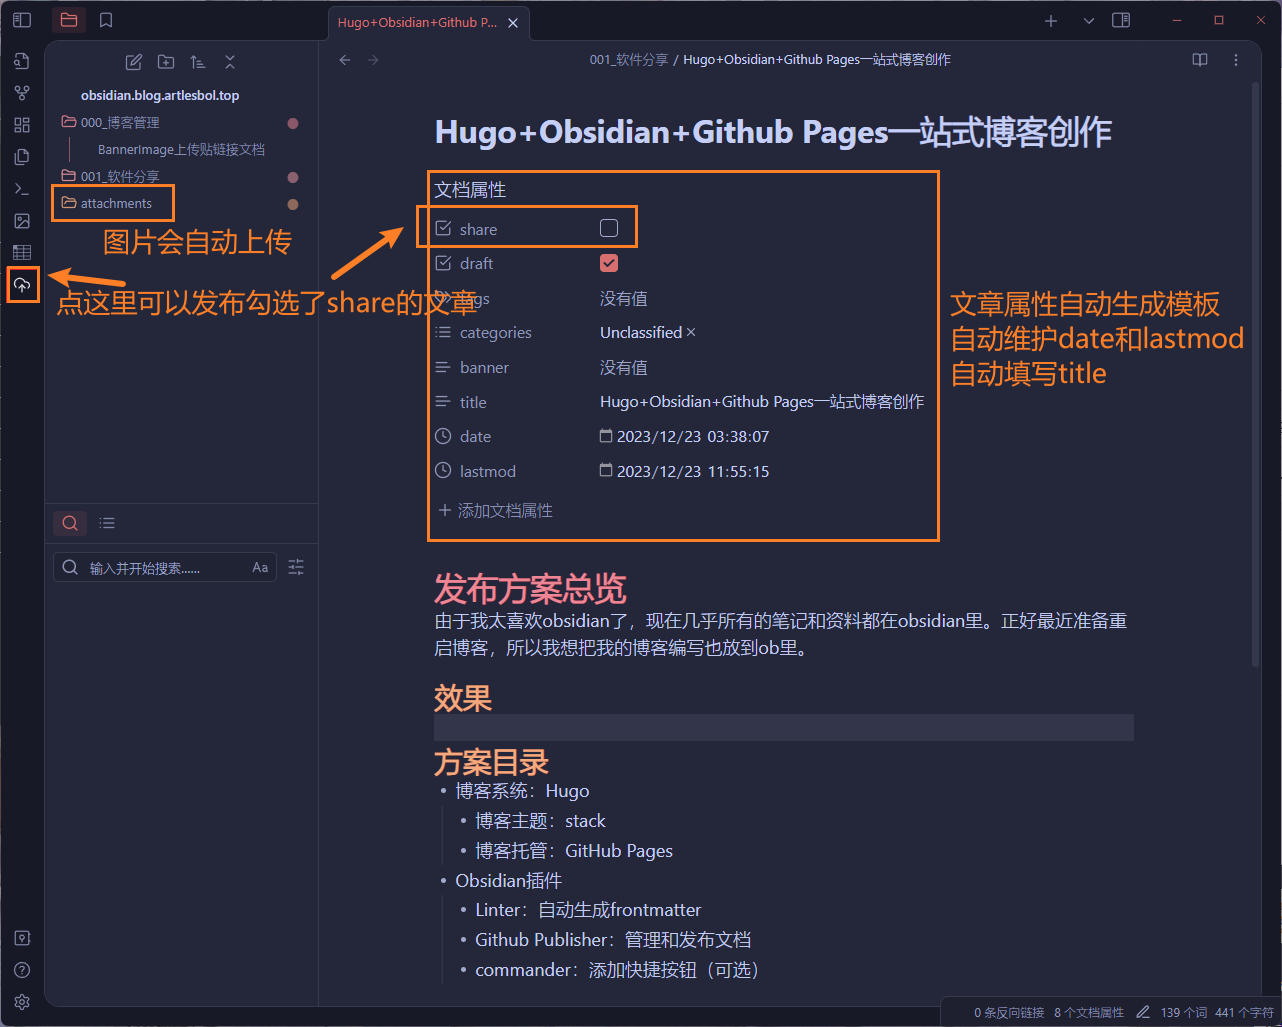
效果
- 创建笔记的时候会生成frontmatter,自动维护date, lastmod, title
- 勾选frontmatter里的share之后点击左侧快捷按钮即可发布,可以发布一个也可以批量发布
- 发布时附件图片会自动上传到对应的资源目录
方案目录
- 博客系统:Hugo
- 博客主题:stack
- 博客托管:GitHub Pages
- Obsidian插件
- Linter:自动生成frontmatter
- Github Publisher:管理和发布文档
- Commander:添加快捷按钮(可选)
配置
首先建一个自己用来存博客文章的仓库,克隆到本地
Hugo
Hugo本体
Reference:Quick start | Hugo (gohugo.io)
参考官方文档直接使用包管理器安装hugo
然后生成hugo站,初始化目录,这里把quickstart改成自己的站名
1
2
| hugo new site quickstart
cd quickstart
|
然后把里面的东西都copy到自己仓库的目录里,这样Hugo站本体生成就完成了
Hugo主题
Reference:Getting Started | Stack (jimmycai.com)
我用的主题是Stack,非常好看(大概)
根据hugo官方文档,安装方法是在仓库目录下执行以下命令,当然你可以换成对应的其他主题。这里建议自己fork一个主题仓库,因为可能需要添加图标或者其他的东西。
1
| git submodule add git@github.com:Artlesbol/hugo-theme-stack.git themes/hugo-theme-stack
|
Hugo配置
hugo通过根目录下的config.yaml文件进行配置,这里我直接用了主题提供的配置文件进行修改,具体可以参考对应主题的文档和hugo官方文档,都会有一些参数和配置说明。你至少需要配置theme = 'hugo-theme-stack'来使用主题。
配置好之后可以用下面的命令在本地编译并启动服务,可以预览一下
Github Pages
Reference:Host on GitHub Pages | Hugo (gohugo.io)
我选择使用Github Pages来托管博客,参考官方文档:
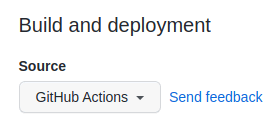
- 首先设置Pages的发布源为Github Actions
- 创建
.github/workflows/hugo.yaml在其中写入如下内容
 1
 2
 3
 4
 5
 6
 7
 8
 9
10
11
12
13
14
15
16
17
18
19
20
21
22
23
24
25
26
27
28
29
30
31
32
33
34
35
36
37
38
39
40
41
42
43
44
45
46
47
48
49
50
51
52
53
54
55
56
57
58
59
60
61
62
63
64
65
66
67
68
69
70
71
72
73
74
75
76
77
78
| ## Sample workflow for building and deploying a Hugo site to GitHub Pages
name: Deploy Hugo site to Pages
on:
# Runs on pushes targeting the default branch
push:
branches:
- main
# Allows you to run this workflow manually from the Actions tab
workflow_dispatch:
## Sets permissions of the GITHUB_TOKEN to allow deployment to GitHub Pages
permissions:
contents: read
pages: write
id-token: write
## Allow only one concurrent deployment, skipping runs queued between the run in-progress and latest queued.
## However, do NOT cancel in-progress runs as we want to allow these production deployments to complete.
concurrency:
group: "pages"
cancel-in-progress: false
## Default to bash
defaults:
run:
shell: bash
jobs:
# Build job
build:
runs-on: ubuntu-latest
env:
HUGO_VERSION: 0.121.0
steps:
- name: Install Hugo CLI
run: |
wget -O ${{ runner.temp }}/hugo.deb https://github.com/gohugoio/hugo/releases/download/v${HUGO_VERSION}/hugo_extended_${HUGO_VERSION}_linux-amd64.deb \
&& sudo dpkg -i ${{ runner.temp }}/hugo.deb
- name: Install Dart Sass
run: sudo snap install dart-sass
- name: Checkout
uses: actions/checkout@v4
with:
submodules: recursive
fetch-depth: 0
- name: Setup Pages
id: pages
uses: actions/configure-pages@v4
- name: Install Node.js dependencies
run: "[[ -f package-lock.json || -f npm-shrinkwrap.json ]] && npm ci || true"
- name: Build with Hugo
env:
# For maximum backward compatibility with Hugo modules
HUGO_ENVIRONMENT: production
HUGO_ENV: production
run: |
hugo \
--gc \
--minify \
--baseURL "${{ steps.pages.outputs.base_url }}/"
- name: Upload artifact
uses: actions/upload-pages-artifact@v2
with:
path: ./public
# Deployment job
deploy:
environment:
name: github-pages
url: ${{ steps.deployment.outputs.page_url }}
runs-on: ubuntu-latest
needs: build
steps:
- name: Deploy to GitHub Pages
id: deployment
uses: actions/deploy-pages@v3
|
- 然后就配置好了,可以提交一个commit测试一下有没有成功触发,如果触发了就可以访问自己的站了
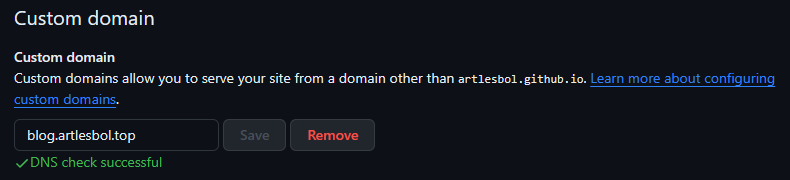
- (可选)配置自己的域名,先在dns服务商处添加一天CNAME解析,指向
<user>.github.io,然后在Pages设置里写入自己的域名即可
Obsidian
Linter
Linter是为了自动维护frontmatter而启用的插件,需要配置多个地方,你也可以根据自己的需要调整。
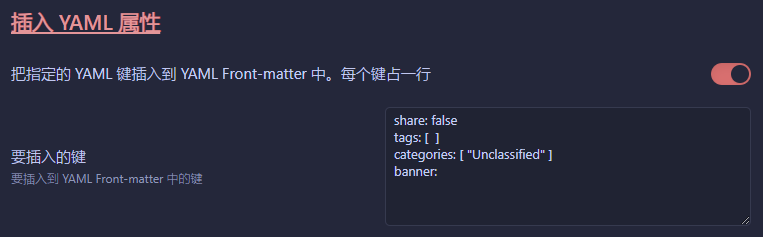
我这里用了share,tags,categories,banner,title,date,lastmod
自动格式化
设置自动格式化,可以在保存和切换的时候格式化,自动维护

插入的属性
这里插入需要手动写的属性即可,下面会有其他自动维护的
时间戳
用于显示文档创建时间和最后修改时间
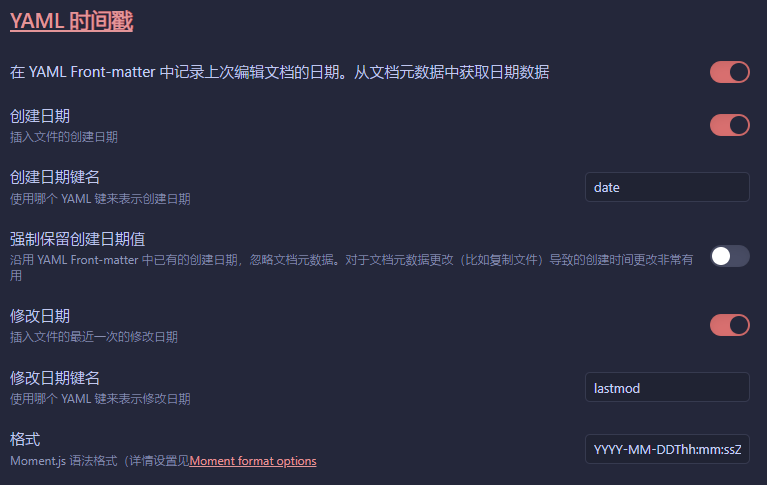
标题
获取文件名作为title

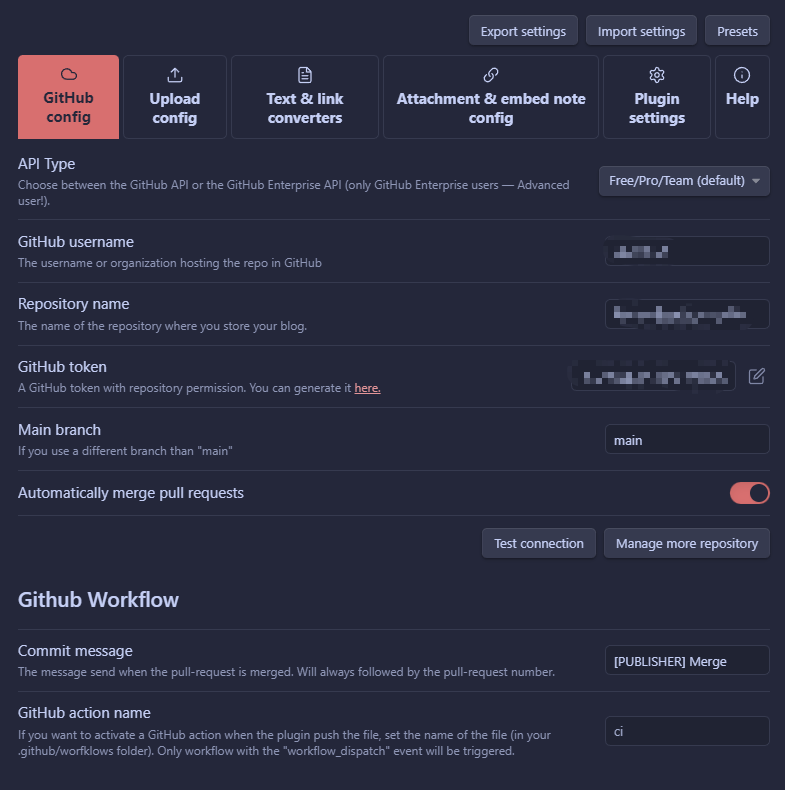
Github Publisher
Github Publisher是用于发布的插件
基础
你需要生成一个Github token用于插件与GIthub的交互,生成方式可以点击插件上的链接
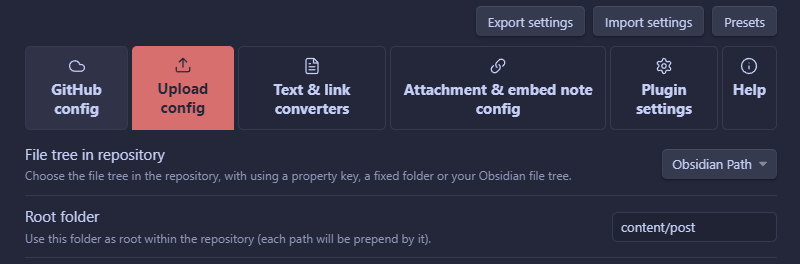
上传路径
首先配置文件的路径,这里的Root folder表示上传到仓库的目录,这里选择Obsidian Path即可,他会按照Obsidian的目录结构上传,由于Hugo不在乎目录结构,所以如此管理即可。
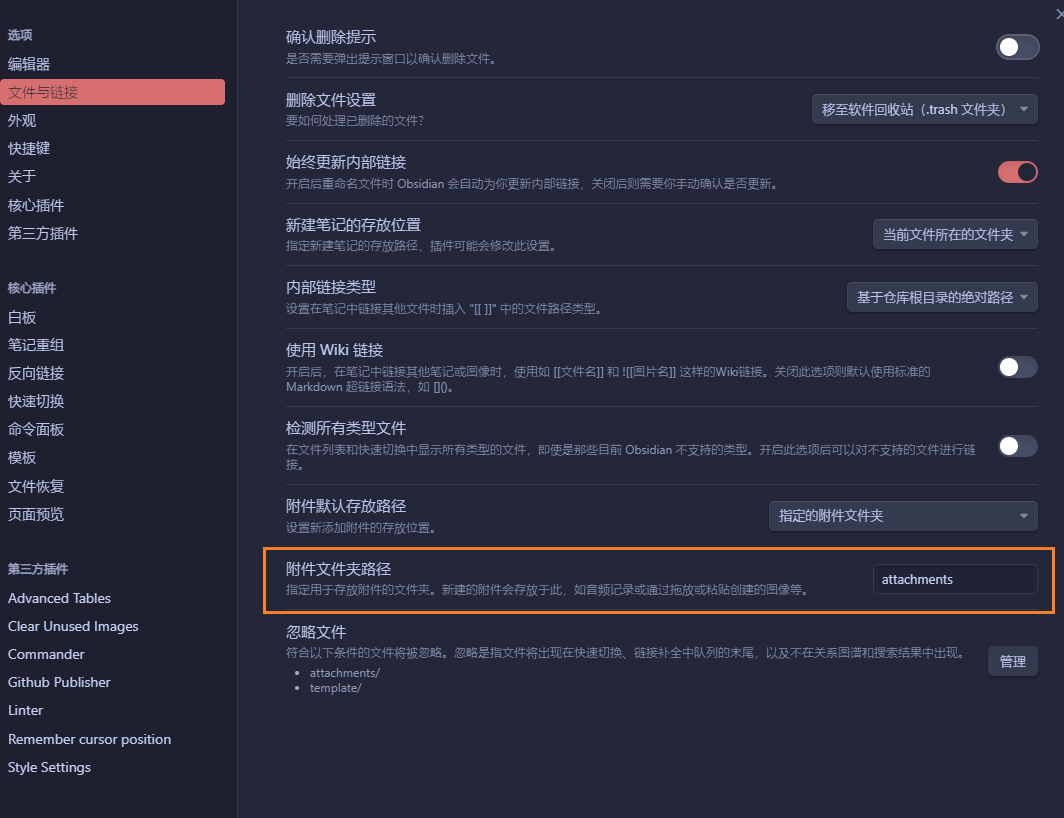
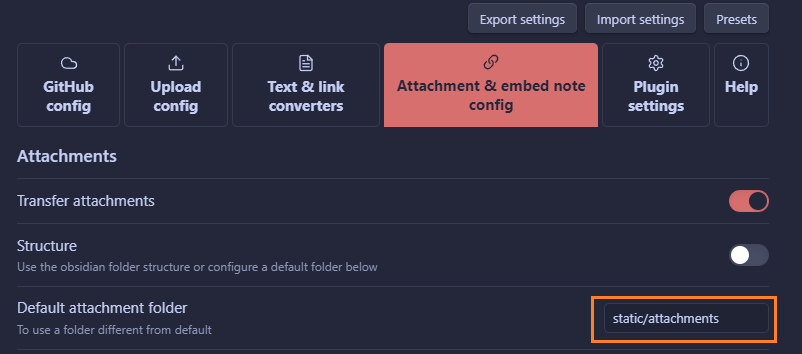
其次是附件上传,Hugo从static目录读取静态资源,为了保持路径一致,我在Obsidian中的图片全部保存在attachments目录下,然后附件自动上传目录设置为static/attachments即可。
Commander
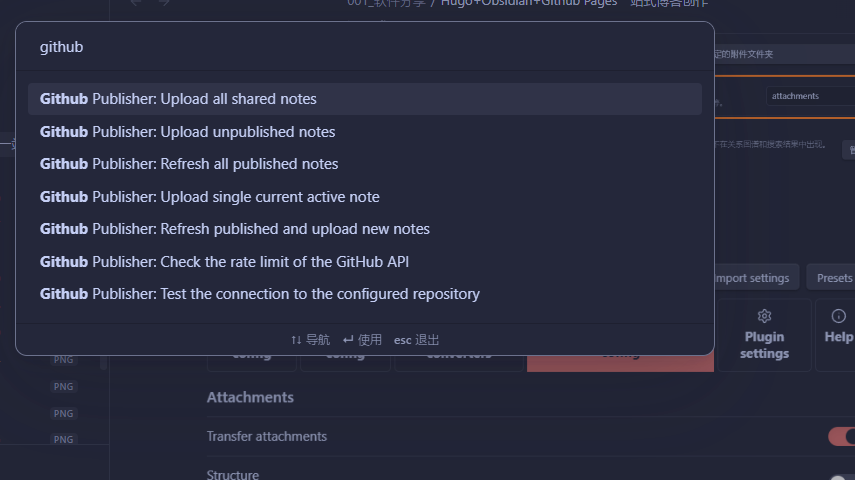
配置到这里其实就已经可以使用了,Ctrl + P输入Github Publisher即可看到所有的指令。
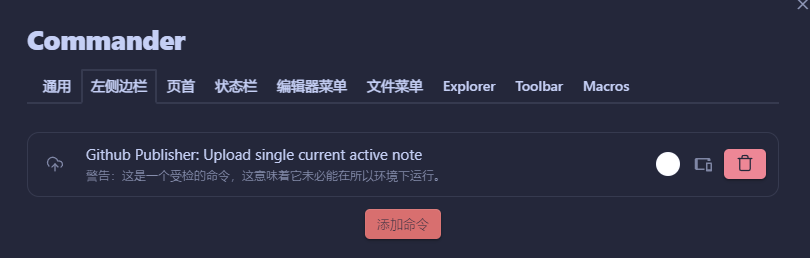
这里常用的是发布单个文件,每次都要输一下很麻烦,所以我用Commander插件做了一个快捷按键,来到插件配置页,选着左侧边栏,添加命令即可。
总结
到此所有的配置都做完了,仅仅勾选share就可以无压力的发布Obsidian的文档到Hugo。